I’m currently helping to deploy Power Automate as a self-service automation tool. As part of that effort, I’ve been hosting weekly half an hour webinars where we build sample flows. So far we’ve worked with triggers and actions from Teams, Office 365 Outlook, Forms, SharePoint, Approvals, Excel Online, and User 365. And when you understand a little bit of the underlying architecture, these applications work together so well in Power Automate. But, there is almost always a little bit of extra context or explanation required. Earlier this week, I posted a write-up of the things you need to know for building flows with Forms. And now, I’m going to dive into what you need to know to update Excel with Power Automate.
Working With Excel in Power Automate
First, let’s make sure we are on the same page with regards to what we can and what we can’t modify in Power Automate. Power Automate works with Excel when it is stored in Teams, SharePoint, and OneDrive. In theory, Power Automate can also work with Excel files stored on a shared drive or network drive, BUT you’ll need Power Automate Desktop rather than the cloud-based Power Automate to modify them. This post will cover working with Excel in Power Automate (cloud).
Excel Online
To manipulate Excel files in Power Automate, search for the action type Excel Online. Power Automate provides two options. One is specific to OneDrive, and the other you can use for SharePoint or Teams (whose underlying infrastructure is SharePoint).

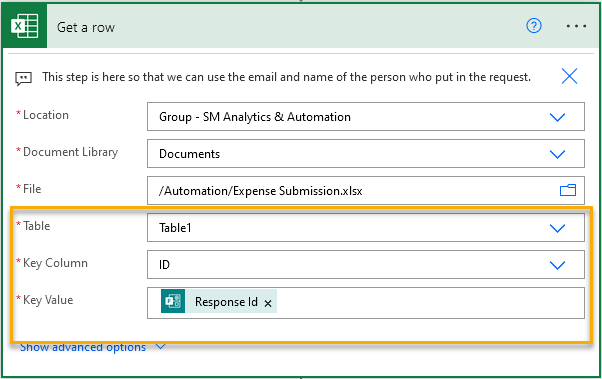
Most Excel actions will have the following configuration requirements – Location, Document Library, File, Table, Key Column, and Key Value. Power Automate requires all of this information. Many folks get hung up at Table, Key Column, and Key Value. What exactly are you supposed to enter for these inputs? Well, let me start by explaining what a table is.

What is a named table?
To be more specific, a table refers to a named table in Excel. Named tables are easy to spot in the worksheet because they are formatted with color and borders. If you click inside the table, a Table Design menu will appear in the ribbon. The Properties section of the ribbon contains the Table Name, which you can change. Power Automate uses named tables because it is an efficient way to direct the application to specific cells in a worksheet. Tables can expand and contract, and you aren’t tied to specific cell references, which can break and change.

In fact, this is such an integral part of Microsoft products that when you create a Microsoft Form from Teams, they automatically create an Excel file with a named table to capture form responses. The table expands to include each new response.
How do you create a named table?
But what if you just uploaded a file to a Team or SharePoint. How do you create a table from scratch or make changes to a table? It’s really easy. This short video shows you how.
And that is how you create a named table in Excel. But what about the Key Column and Key Value? What is a Key Column?
Key Columns and Key Values
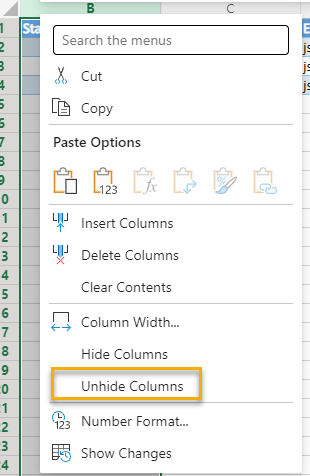
The Key Column is a column of data in the table whose value uniquely identifies a row. The screenshot below shows the Excel file that Microsoft created for me when I built a form in Teams. Note, when I first open the file, it starts at column B. There is an ID column, but I guess Microsoft decided you don’t need to see it, but it is there.

Right-click on column header B and select Unhide Columns.

Now, the ID column is visible. The value in the column uniquely identifies each row.

In this case, Microsoft created the file for me and added the ID column. If you created the file, then you’ll need to add an ID column. It doesn’t have to be named ID, but it does need to uniquely identify each row. In the short video posted above, there was no ID column. In theory, as long as my start date identifies the row, I could use that column…..I think…might have to check if it will allow dates to be used as IDs, but you get the idea.
Now, you are armed and ready to manipulate Excel documents in Power Automate. If you enjoyed this content check out the other posts in the series.
Other Sweet Power Automate Content
- Getting Oriented with Power Automate
- Exploring Power Automate Triggers & Actions
- Building & Developing in Power Automate
- Troubleshooting in Power Automate
- Combatting File System Frustration in Power Automate
- What Can You Do With Office 365 Triggers in Power Automate?
- Two Reasons to Keep Tidy Connections in Power Automate
- How to Decipher Dynamic Content in Power Automate
- Create An Approval Flow in Power Automate
- Working with Microsoft Forms in Power Automate
Pingback: Working with Microsoft Forms in Power Automate » The Analytics Corner
Pingback: Make Finding the Name of Day or Month in Power Automate Easy! » The Analytics Corner