A user reached out to me on LinkedIn last week with questions about an IronPython script he found in the TIBCO Community. The script attaches to a drop-down property control and helps users jump from page to page. Buttons are usually my go-to navigation medium, but if you have a lot of pages, they take up a lot of space. Using a drop-down maximizes real estate while giving full navigation capabilities. Read on to learn how to use IronPython to navigate Spotfire pages.
Blog or Video
Navigation in Spotfire
Before we dive into the script, I want to make sure you understand the navigation options in Spotfire so that you understand why this script is so useful. I’ll talk about page navigation options first and then how to navigate with action controls before explaining the IronPython script.
Page Navigation Options
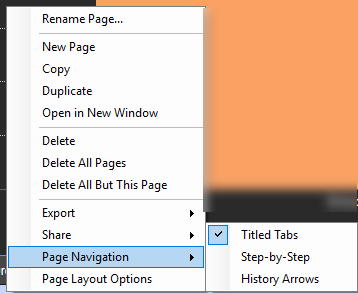
Spotfire provides 3 options for navigation out of the box. There is a 4th option (Off) in the more recent versions of Spotfire. I’m on version 10.3.

Tiled Tabs
Tiled Tabs are the default option in the application. The user sees all named pages. More recent versions of Spotfire allow you to hide pages.

Step by Step
When using Step-by-Step, pages appear as numbered links, supplemented with Next and Previous links. The user cannot see page names, but they can navigate to all pages. Use this method when the order of the pages is important, and you want to present the analysis in a step-by-step flow.

History Arrows
History Arrows can be used in conjunction with action controls like links or buttons. Users see only the name of the current page, and you proceed to another page via an action control. The page history arrows next to the page title makes it possible to return to a previously visited page.

Navigation Off
You can also turn off all navigation, meaning that neither tabs, links nor arrows will be available. With this setting, the analysis workflow is handled using action controls (buttons, links, images). I don’t have this option in 10.3, so it doesn’t appear in my screenshot.
Rarely, do I differentiate from Tiled Tabs because I like seeing all the pages, and it seems like I am always adding and deleting pages, but I do use buttons quite a bit. I expect that when I have the ability to turn off all navigation, I will use this option and direct users with action controls, so let’s talk about those.
Navigating with Action Controls
In addition to the page navigation options I just showed, developers can also provide navigation with 4 types of action controls. Because I know you came for the IronPython script, I won’t dive deep, just provide an overview.
Spotfire provides 4 types of action controls that can be added to text areas.
- Buttons
- Links
- Images
- Bookmarks
When you are in the text area, right-click and select either Edit Text Area or Edit HTML. Click the add action control button as shown below.

Choose your control type and the rest of the configuration will be naming the button or link or adding the image.

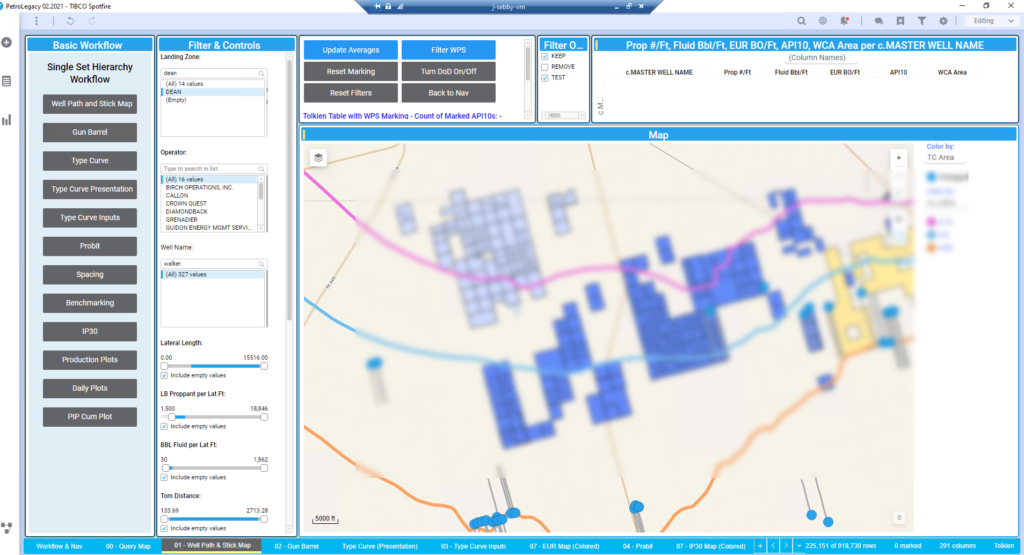
Action controls are easy to create, but as you can see in the example below, my buttons take up a lot of space, which is why this IronPython script is so handy.

IronPython Script
Instead, you can attach an IronPython script to a drop-down property control for navigation. This was originally posted on the TIBCO Community.
If you are new to property controls, check out this post I just wrote on how to create the drop-down. See below for detailed steps and code snippet.
Detailed Steps
- Make sure all of your pages are named as you want them to be named. If you rename them later, you’ll have to modify the property control (but not the script).
- Create a drop-down property control as described in this post. In step 9, choose Fixed Values instead of Column Selection.
- Add a row in Fixed Values for each page you want to navigate to. The Display Name can be anything. The Value must match your page names exactly. If you change the page names, this is what you need to update.
- After creating the property control, while you are still in the Create Property Control dialog box, click the Script button.
- Change the radio button to Execute the script selected below.
- Click the New button.
- Name the script.
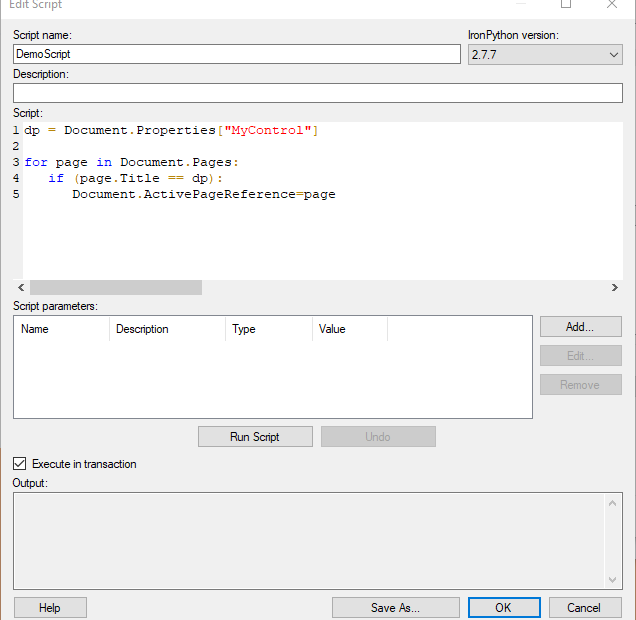
- Copy and paste the script shown above into the Script dialog.
- Replace “MyPage” with your document property name.
- Click Run Script to test that it runs without error.
- Click OK three times to get out of all the dialogs.
- Duplicate the text area and place it in each of your pages (or add the same property control to a text area in each of your pages).
dp = Document.Properties["MyPage"]

for page in Document.Pages:
   if (page.Title == dp):
      Document.ActivePageReference=page
The script uses a for loop and an if statement. It begins with the creation of an object called dp that is equal to the document property called MyPage. Then, for every page (page is a user-created object) in the Document (as reference by the API Document.Pages), the script uses an if statement to say if the page title is equal to the document property, make that the active page. The script is only triggered when the drop down changes.
Now, when you change the drop-down, the analysis jumps to that page, and you know how to use IronPython to navigate Spotfire pages.

Hi!!
Big mountain analytics
My name is LALIT i am from INDIA and i am new to ironpython
would you please tell how to learn ironpython??
Anybooks or Methods to learn ??
I learned by working thru one code snippet at a team. There isn’t really a quick or easy way I’m afraid.